
Creating a DIY concrete room divider? Oh, trust me, it’s easier than explaining why I still have leftover takeout in my fridge from last month.
First, I gathered my materials—think concrete mix and molds. My workspace? A disaster zone, naturally. I remember one time, I thought I was a concrete Picasso until my mold broke apart.
But I persevered! I mixed, poured, and cured that concrete like a pro. After some sanding and sealing, I finally installed it, adding my unique flair.
Want to know more? Stay with me for some creative inspo!
Real-Life Design Project: Concrete Walls, Real Drama
One time, I worked with a client who wanted a concrete feature wall. It was all about that modern, industrial vibe. We chatted about textures, colors, and how to make it pop! They were skeptical about the weight—who wouldn’t be? But once we got that beauty installed, it was a game changer. The drama, the depth—it transformed their whole space! Concrete might seem daunting, but with a little creativity, it can be stunning. Trust me, it’s all about the right approach!
Key Takeaways
- Select lightweight materials like plywood and a durable concrete mix for a sturdy yet mobile room divider.
- Prepare molds using melamine and apply a release agent to ensure easy concrete removal.
- Mix concrete properly, maintaining the right consistency for strength and ease of pouring.
- Incorporate finishing touches like sealants, color, and glass to enhance aesthetics and functionality.
- Perform regular maintenance checks to preserve the divider’s appearance and structural integrity over time.
Gather Your Materials

When you’re ready to tackle your DIY concrete room divider, the first step is gathering your materials.
You’ll want to evaluate material selection and design considerations for weight distribution and space efficiency. Think about texture options and color schemes that fit your vibe. incorporating creative design elements can enhance the visual appeal of your divider. Don’t forget about structural integrity and insulation properties; those will keep your space cozy and stylish! consider using lightweight plywood for easier mobility and a more aesthetically pleasing finish.
Ready to get started?
Prepare Your Workspace

Here’s how I set things up for success:
- Clear debris and obstacles.
- Lay down protective coverings.
- Guarantee good ventilation. Implementing ventilation techniques can reduce dust inhalation in large workspaces, ensuring a safer and more comfortable environment for working with materials like concrete.
- Organize tools and materials within reach. Having a well-organized workspace can significantly enhance efficiency and help streamline the DIY process.
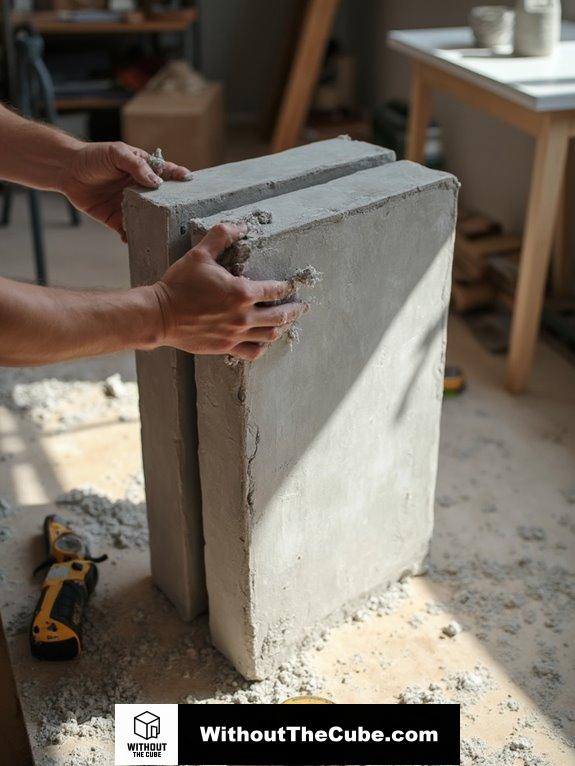
Create the Concrete Mold

Creating the concrete mold is a crucial step that sets the foundation for a successful room divider. A well-constructed mold can significantly enhance the overall quality of your modern concrete furniture. I love using melamine as my mold material; it’s inexpensive and easy to find! Just keep in mind, the mold dimensions need to match your project measurements perfectly. Proper planning is essential for a successful installation, especially when creating a permanent divider wall. Cut your pieces accurately, assemble them snugly, and you’ll be well on your way to a fabulous divider!
Mix the Concrete
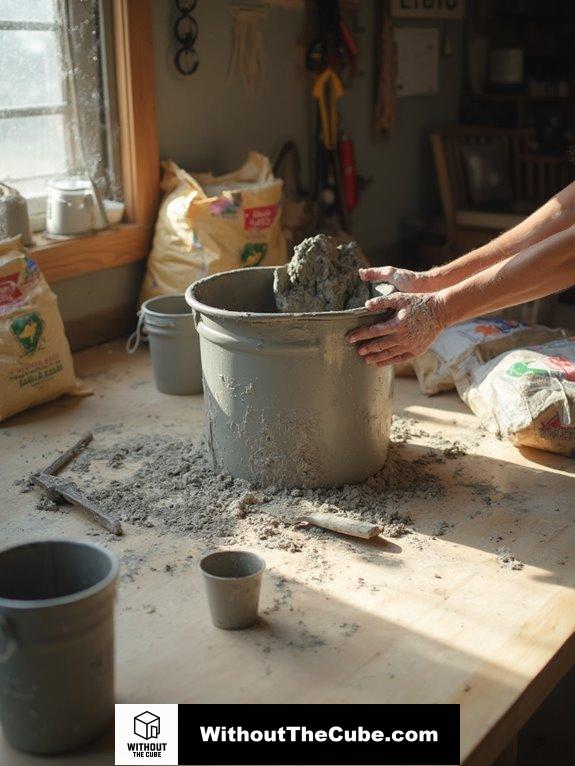
How do you guarantee your concrete mix achieves the right consistency for your room divider?
It’s all about the right mixing techniques and safety precautions!
Here’s a quick guide:
- Start with water in your mixer.
- Add your dry ingredients in proper proportions.
- Gradually mix in cement to avoid clumps.
- Adjust water for that perfect blend.
Finding the right water amount is crucial to maintain the compressive strength of your mix. ensuring that your mix is thoroughly combined will help achieve the desired texture for your project.
Let’s get mixing and create something fabulous!
Pour the Concrete

Pouring the concrete is a crucial step in crafting your room divider, and it’s essential to approach it with care.
I’m all about those concrete pouring techniques! Keep in mind to reflect on slab thickness, too. Remember that selecting the right mixing ratio is important to achieve the desired strength and finish for your project.
Start with one side, then smoothly pour the mix, ensuring it flows evenly. It’s like magic!
And don’t overlook—keeping things level is key for that sleek, modern look we all crave. Proper preparation and execution are crucial for lasting results in your project. Happy pouring!
Allow Concrete to Cure

Curing concrete is an essential process that directly impacts its strength and durability. To guarantee your concrete shines, try these curing techniques:
- Keep it moist with water curing.
- Seal in moisture using chemical curing.
- Cover with plastic sheets for sheet curing.
- Insulate with curing blankets to control temperature. Proper curing helps to maximize concrete’s strength and ensures that moisture retention is maintained, leading to optimal results. Trust me, proper moisture control is key to a beautiful, lasting divider!
Remove the Mold

Mold can be a stubborn adversary when it takes hold of your new concrete room divider.
To tackle it, I use eco-friendly cleaning techniques like vinegar or dish soap. Recall, keeping moisture at bay is key for mold prevention! Regular inspections for rust or corrosion will help identify any potential mold issues early on. Always wear gloves and ventilate your space while scrubbing away. Incorporating textured concrete organizers into your design can also enhance aesthetics while being functional.
Let’s keep our designs fresh and fabulous—after all, we created this blog, Without The Cube, to inspire superior interiors!
Finish and Seal

After all the hard work you’ve put into creating your concrete room divider, it’s time to finish and seal it for lasting beauty and protection.
Consider these sealer types and application methods:
- Choose between water-based or solvent-based sealers.
- Opt for penetrating or acrylic sealers.
- Use polyurethane for high durability.
- Follow instructions for proper application. a good sealer can enhance the aesthetic appeal of your concrete surface.
using a sealer will help maintain the integrity of the non-load-bearing structure you’ve created.
Let’s keep that beauty shining bright!
Install the Room Divider
With the finishing touches in place, it’s time to install the room divider and bring your vision to life.
Consider design considerations and divider styles that enhance room functionality and aesthetic appeal. remember that the partition wall serves to separate the workspace from storage, providing a clear distinction in your space.
Don’t forget sound insulation for a cozy vibe!
Keep safety measures in mind, and keep in mind maintenance tips for longevity.
Plus, think about lighting integration for that extra wow factor.
Ready to transform your space? Let’s go!
Textures and Colors

Incorporating textures and colors into your DIY concrete room divider can dramatically elevate its visual appeal and functionality.
Here’s how you can do it:
- Play with color contrasts to create eye-catching focal points.
- Use baking soda for unique texture contrasts.
- Consider luxurious stone finishes, which provide natural durability and a timeless look.
- Add glass elements for light flow.
Let’s embrace color psychology and make your space uniquely you!
FAQ
What Is the Best Type of Concrete for a Room Divider?
When considering the best concrete types for my room divider designs, I prefer reinforced concrete for its strength and durability. It balances aesthetics and functionality, ensuring my space feels modern while standing the test of time.
How Long Does It Take for Concrete to Cure Completely?
So, if you think concrete’s like a fine wine, you’re right! The curing process takes about 28 days, influenced by temperature impact. Just don’t rush it; concrete’s got its own timeline for strength!
Can I Add Color to the Concrete Mix?
Absolutely, I can add color to my concrete mix using color pigments. By exploring various staining techniques, I can create unique finishes that elevate my project and make it truly innovative and eye-catching.
What Safety Equipment Is Essential for This Project?
When tackling any concrete project, I swear by my safety goggles and protective gloves—they’re my armor against potential hazards. Prioritizing safety gear isn’t just smart; it’s essential for an innovative and successful experience.
How Do I Maintain My Concrete Room Divider Over Time?
To maintain my concrete room divider, I use effective cleaning techniques like scrubbing with a nylon brush. For repair tips, I fill cracks with caulk and regularly inspect for wear, ensuring it stays innovative and durable.
Summary
I’ve just crafted my own concrete room divider, and it really transformed my space.
It’s both practical and aesthetically pleasing. Now, I can enhance it with plants or artwork to make it truly mine.
I’d love to hear about your own DIY projects. How did they turn out?
If you enjoyed this post, please share it on social media to help us spread the word about Without The Cube!
Leave a Reply