Creating modern concrete furniture? Oh boy, let me tell you—it’s a wild ride that’s totally worth it!
I started this adventure in my tiny apartment, armed only with a bag of cement and a dream.
First, I gathered my materials like a kid collecting Pokémon cards. Then, I built a frame that could probably survive a zombie apocalypse.
Mixing that concrete was like making a smoothie—don’t overdo it or you’ll end up with a sad, weak mixture!
After curing, I smoothed the surface to a shine that made me feel like a DIY Picasso.
I jazzed up my piece with funky colors and wooden accents, and now it’s the pride of my living room. Who knew concrete could be so chic?
And hey, if you want to dive deeper into superior interior design, check out my blog, Without The Cube—it’s all about breaking the mold in style!
My Concrete Journey with a Client
Once, I worked with a client who wanted a statement dining table. They envisioned something bold yet elegant.
We landed on concrete, but with an unexpected twist—a wood inlay! The challenge? Balancing the rawness of concrete with sophistication.
After the mix and pour, we added a splash of color that echoed their vibrant kitchen. The final piece wasn’t just furniture; it was a conversation starter.
Concrete furniture can be both functional and stunning—who would’ve thought?
Key Takeaways
- Prepare a sturdy frame and mold using 1″x2″ boards and plywood, ensuring stability and shape retention for the concrete furniture piece.
- Mix concrete with proper proportions of cement, aggregates, and water, aiming for a consistency similar to cooked oatmeal for optimal strength.
- Pour the concrete in layers, leveling and smoothing the surface while tapping the mold to release air bubbles for a polished finish.
- Secure wooden components to the concrete base using screws and reinforce with metal brackets to ensure structural stability in the final assembly.
- Customize your furniture by experimenting with different molds, textures, and natural elements to reflect your individual style and enhance aesthetics.
Gather Your Materials
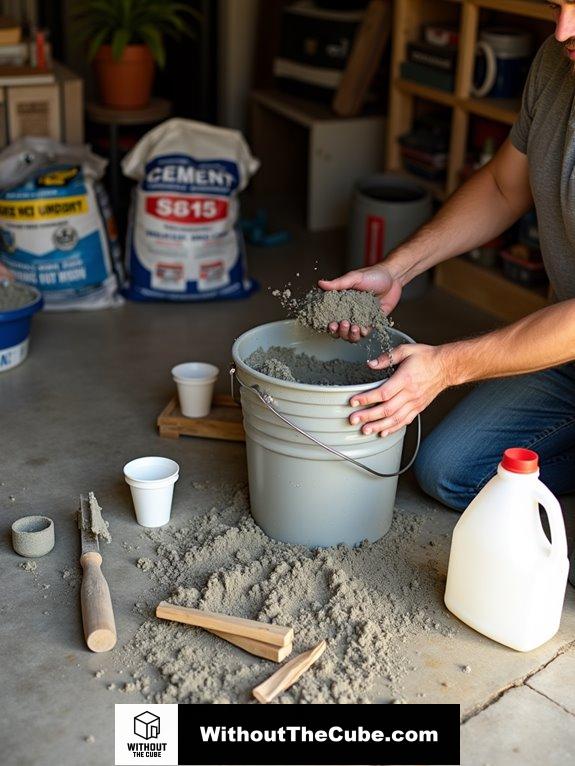
When I commence on a DIY concrete furniture project, I often start by gathering my materials.
It’s like gathering the Avengers for a superhero team-up, but with cement and sand instead of capes!
First up, I need cement, the backbone of my concrete mixture. A well-chosen concrete mix design can significantly impact the final result.
Then, I grab aggregates—think sand, gravel, or crushed stone—because who doesn’t love a little extra strength?
Don’t forget water; it’s essential for mixing things up.
If I’m feeling fancy, I might toss in some glass fibers for that added oomph in strength. This is especially beneficial because featherstone GFRC combines cement, aggregates, water, and glass fibers, enhancing the performance of my furniture.
And let’s not skip the sealants; they keep my masterpiece looking fresh and fabulous.
Ready to plunge into it?
Trust me, this is where the magic begins!
Prepare the Frame
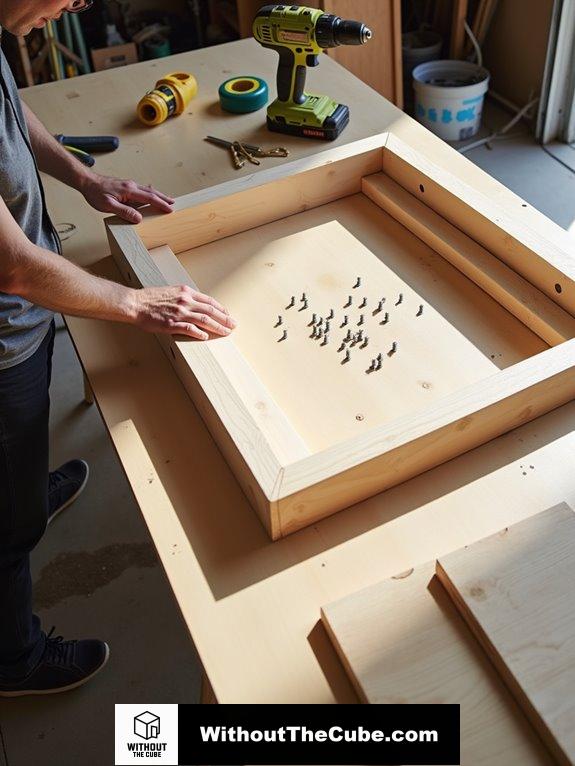
Creating a sturdy frame is essential for your concrete furniture project. Trust me, you don’t want your masterpiece to wobble like a toddler on roller skates!
First, I grab some 1″x2″ boards and cut them to size, wrapping them around a plywood base for that solid support. I attach the boards with screws, but keep in mind to drill pilot holes first—no one likes a splinter! For larger tables, I add steel reinforcement under the melamine. It’s like giving your table a superhero cape—extra strength! Using rebar or wire mesh for this reinforcement is highly recommended for added durability. This method contributes to the overall minimalist concrete shelving aesthetic, ensuring that your furniture not only looks good but is also functional.
Lastly, I double-check everything. Is the frame level? Square? If it’s not, it’s back to the drawing board.
Create the Tabletop Mold
With the frame all set and sturdy, it’s time to focus on crafting the tabletop mold.
First, I’m picking my material—wood, metal, or even foam can work wonders here. I want something sturdy to hold that concrete and keep its shape. The custom wooden molds used in furniture design provide a great example of how to achieve organic, flowing shapes. Many modern concrete furniture designs often incorporate minimalist aesthetics, which can influence my choice of mold.
Now, let’s talk design—what size and shape do I want? I can even get creative with flexible molds for those unique curves.
Don’t forget to seal the mold to prevent any sticky situations. A release agent will be my best friend for easy concrete removal.
And hey, if I want some flair, I can add special coatings for texture.
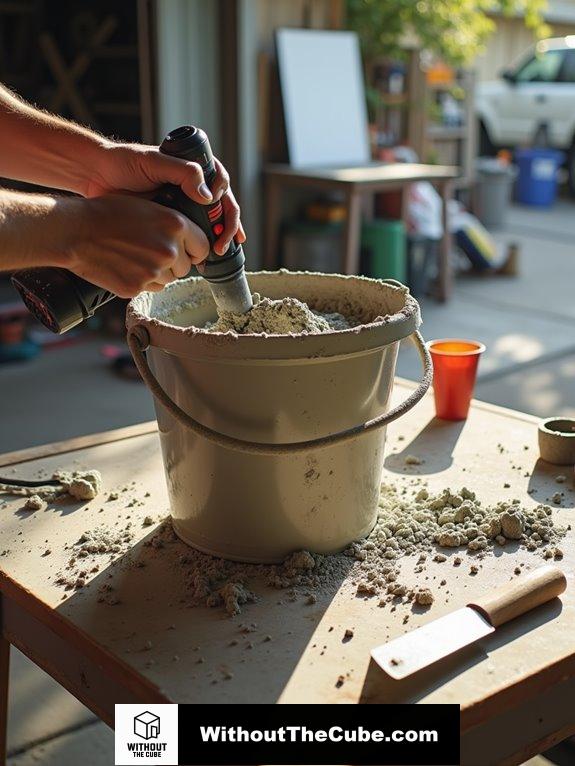
Mix and Pour Concrete

Mixing and pouring concrete is where the magic truly begins; it’s essential to get this step right for a durable and attractive piece of furniture.
I always aim for a consistency like cooked oatmeal—trust me, it makes all the difference! Keep in mind, less water is key to keep it strong, so don’t go overboard. Using recycled concrete can be a sustainable choice that enhances the overall strength of your mix. The use of proper mixing techniques ensures that your concrete achieves optimal durability and finish.
Mixing in the shade? Genius move to stop evaporation from ruining your masterpiece.
When you pour, fill those molds in layers and give them a gentle tap to release air bubbles.
Oh, and don’t forget to use rebar for support; it’s like giving your furniture a superpower!
Level and Smooth Surface
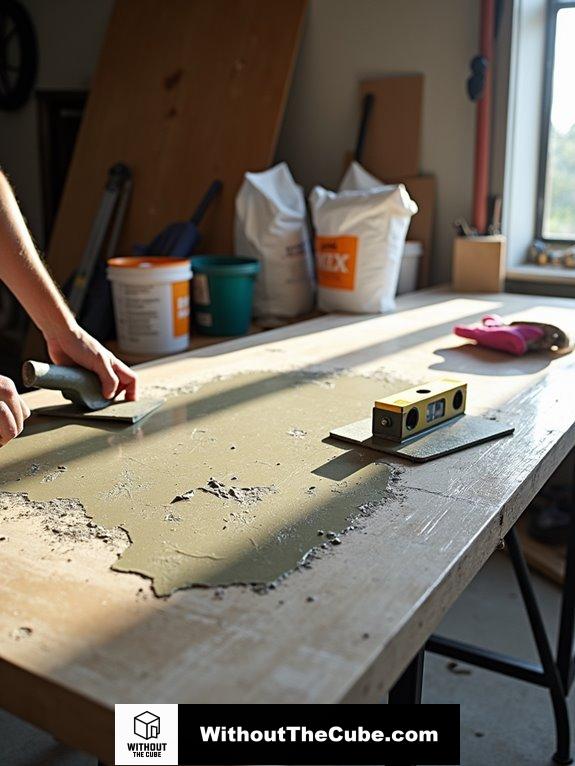
Once your concrete has been poured and set, the next step is leveling and smoothing the surface to guarantee your furniture looks polished and professional.
Now, I know what you’re thinking—how do I avoid the dreaded bumpy look? First, check for low spots using a level. It’s like looking for uneven pizza dough, but less delicious.
Next, clean up any debris that could mess with your masterpiece. You don’t want dirt ruining your vibe! Depending on your situation, you might choose polyurethane foam for quick fixes or self-leveling concrete for that smooth finish. Just keep in mind, understanding concrete leveling is key to achieving the best results! Achieving a perfectly smooth surface is essential for creating stylish minimalist shelving that complements your modern decor.
Let it cure and then admire your work. Ta-da! Your concrete furniture is one step closer to its chic debut!
Apply Additional Layers
Applying additional layers of concrete can elevate your furniture’s durability and aesthetic appeal. Applying multiple layers can enhance the durability of concrete furniture while creating a modern look.
Let’s jump in! First, make sure that base layer is completely dry—trust me, you don’t want uneven drying ruining your masterpiece.
I usually use construction adhesive to secure the caps and prevent any sneaky internal damage.
When you’re ready, mix small batches of concrete. Thin layers are key here, so don’t be tempted to slather it on all at once.
Use a trowel for that smooth finish, and keep in mind, clean the surface of the previous layer for a stronger bond.
Want to add flair? Consider decorative elements like river rock or a splash of paint!
Ready to create something fabulous? Let’s layer it up!
Sand the Tabletop
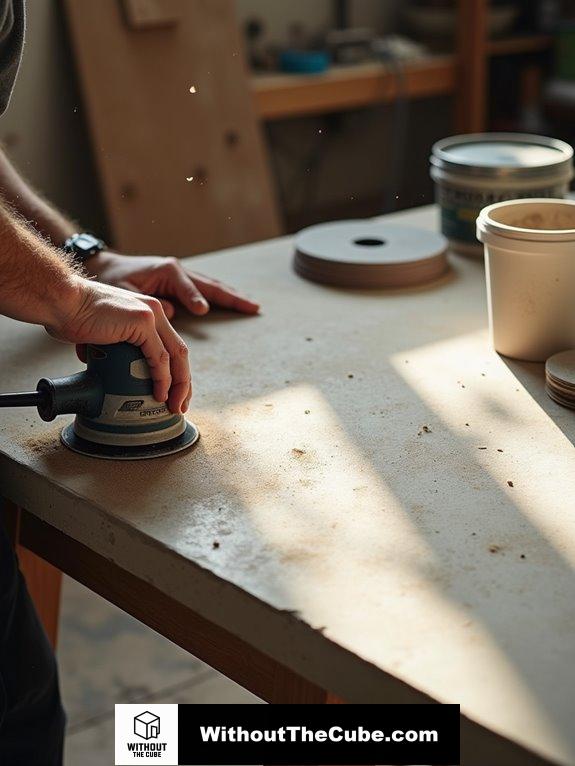
Sanding the tabletop transforms your concrete furniture into a sleek, polished piece that showcases your hard work. Trust me, it’s like giving your creation a spa day! Here’s how to get started:
- Clear the area: Make sure there’s no dust or debris hanging around.
- Fill imperfections: Use a concrete filler for those pesky cracks and holes.
- Choose the right tool: Grab an orbital sander for a smooth finish or a belt sander for larger areas. Selecting the correct tool ensures efficiency and finish quality.
- Start coarse: Begin with lower grit sandpaper and work your way up for that silky feel.
Seal the Concrete
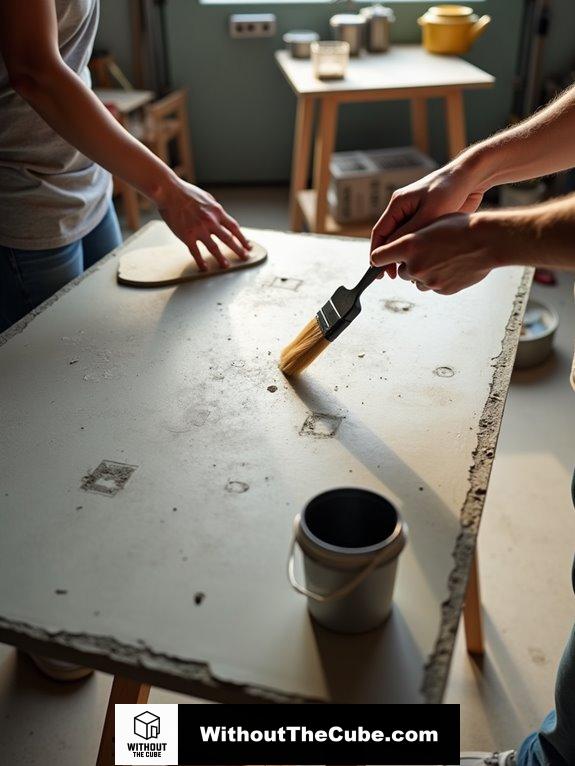
After you’ve achieved that smooth, polished finish on your tabletop, it’s time to protect your hard work by sealing the concrete. Trust me, you don’t want to skip this step—your masterpiece deserves it!
First, clean the surface thoroughly. Anything from dust to grease will mess with your sealer’s grip. Remember, proper surface preparation is crucial for achieving a lasting seal.
Next, consider etching the surface to open up those concrete pores, creating a better bond.
Now, choose your sealer wisely. I love a good penetrating sealer for that nearly invisible look, but those film-building options can give a lovely sheen too!
Keep in mind to apply it in thin coats, waiting for each to dry.
And voilà! Your stunning concrete furniture is now ready to show off—just don’t overlook giving it a little TLC later!
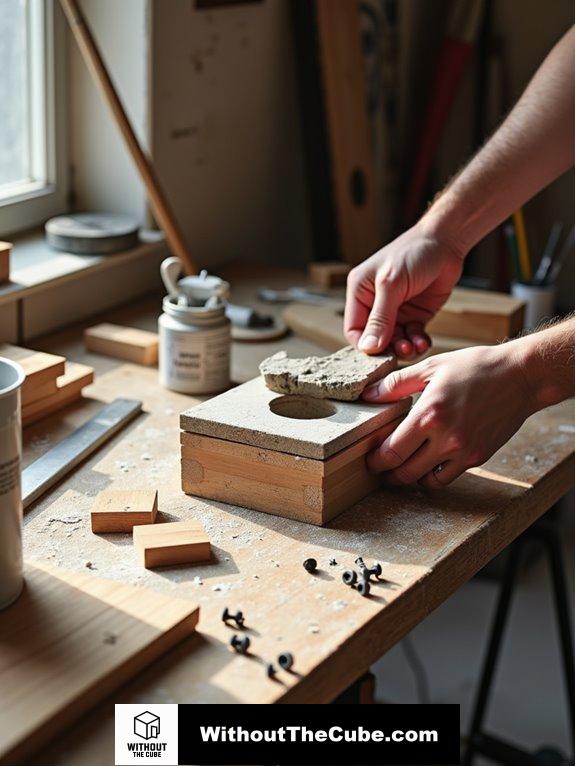
Final Assembly

Once your concrete pieces are fully cured and ready, it’s time to tackle the final assembly. This is where your vision truly comes to life!
Here’s what you’ll need to do:
- Securely fasten the wooden components to the concrete base with screws.
- Give it extra muscle with metal brackets if needed.
- Verify both surfaces are squeaky clean—dust isn’t a friend here!
- Finish it off with a protective coat, like varnish or urethane, to keep everything looking fabulous.
Trust me, double-checking that everything’s snug and stable is worth it. You wouldn’t want your masterpiece to wobble, right?
Let’s get to assembling and create something that’ll make your space shine!
Customize Your Furniture

Customizing your concrete furniture allows you to showcase your personal style and creativity.
Why settle for boring when you can design unique molds using builder’s tubes or melamine? I love creating complex shapes that reflect my flair.
You can even mix materials, like wood and concrete, to craft pieces that are both functional and stunning.
Don’t forget about textures! A smooth finish paired with rough concrete can really catch the eye.
And if you’re feeling adventurous, why not add a splash of color or a fun pattern?
Avoid Overmixing the Concrete
Mixing concrete is a crucial step in creating durable furniture, and knowing how to avoid overmixing can make all the difference. Trust me, you don’t want a lumpy mess!
Here’s how to keep your mix just right:
- Mix for 3-5 minutes – Don’t get too carried away!
- Gradually add water – Start with half and mix, then add the rest.
- Use a mixer – A drill with a paddle works wonders for uniformity.
- Monitor consistency – Keep checking; it should be smooth, not soupy. Ensuring the right mixing time is essential to maintaining the integrity of your concrete.
Overmixing leads to air pockets that weaken your masterpiece.
So, keep your eye on the clock and enjoy the process!
Incorporate Natural Elements
After mastering the art of mixing concrete, it’s time to contemplate how you can elevate your furniture by incorporating natural elements.
Think about adding warm wooden accents to your sleek concrete pieces. It creates a delightful contrast, like a cozy blanket on a chilly day. Additionally, consider that shipping delays may affect the arrival of your natural materials, so plan your projects accordingly.
And hey, who doesn’t love a bit of greenery? Indoor plants can breathe life into your space. You could even consider big windows to let that glorious natural light flood in!
Mixing different textures also works wonders. Envision smooth concrete with rough stone or soft wool—talk about a sensory delight!
So, why not blend vintage-inspired touches with your modern furniture? It’s like giving your home a stylish hug!
Let’s get creative!
Summary
Making concrete furniture is a rewarding experience that allows me to express my creativity. I enjoy crafting unique pieces that not only enhance my space but also impress my friends.
Each step in the process teaches me something new, making it an adventure worth sharing.
I’d love to hear about your own experiences with DIY concrete furniture. What have you created, and how did it turn out?
If you found this guide helpful, please consider sharing it on social media to help others discover the joys of crafting with concrete!
Leave a Reply