
Creating my own minimalist concrete shelving was a wild ride, let me tell you!
First, I gathered all the essentials: concrete mix, molds, and some brackets. You know, the usual suspects. Then came the fun part—designing the shelf. Simple shapes, right?
I prepped my mold, ensuring it was cleaner than my kitchen after a cooking disaster. I poured in the concrete, shaking it like I was at a concert to get rid of those pesky air bubbles.
Finally, I installed the brackets and added some plants to give it that cozy vibe. Who knew concrete could feel so warm?
Curious about how this all went down?
—
Real-Life Client Experience: The Concrete Transformation
I once worked with a client who wanted a sleek, modern look for their living room. We decided on concrete shelves to showcase their favorite books and plants.
After some trial and error, we nailed the design—simple yet striking. The shelves added depth and character, transforming their space into something breathtaking.
It’s incredible how a little concrete can elevate a room. Who knew the right design could turn a dull corner into a cozy reading nook? If only I could’ve seen my kitchen floor after this project!
Key Takeaways
- Choose the right mold material, such as cardboard or melamine, and prepare the base with a release agent to ensure easy removal of the concrete.
- Mix concrete with water and lightweight materials like vermiculite or perlite for a durable yet minimalist shelf design.
- Accurately measure and design the shelf dimensions, considering tiered options for maximizing space and visual appeal.
- Embed concealed brackets in the concrete for a sleek look and ensure secure installation using a hammer drill and masonry lag bolts.
- Maintain the shelves by cleaning with a damp cloth and rotating plants regularly for even growth and aesthetic balance.
Materials Needed

When you’re ready to tackle your DIY minimalist concrete shelving project, it’s essential to gather the right materials.
Trust me, you don’t want to be halfway through and realize you’re missing something vital!
You’ll need concrete mix, of course—cement and water do the trick. If you want lighter shelves, add some vermiculite or perlite. Vermiculite is recommended for lighter concrete mixes, providing a unique texture and weight advantage. using minimalist design principles can help you create a visually appealing and functional shelf.
Don’t forget a mold; cardboard works for quick projects, but if you’re feeling fancy, shuttering plywood is your best friend.
You’ll want concealed shelving brackets for that sleek look, plus a power drill and some bolts to hold everything together.
Design Your Shelf

Now that you’ve gathered all the materials for your minimalist concrete shelving project, it’s time to focus on the design of your shelf.
Think about what you want it to say about your space.
Concrete’s versatility means you can mold it into any shape or texture that fits your vibe—how cool is that?
Got a fireplace? A sleek mantle could be just the ticket!
Or maybe you’re dreaming of floating shelves in the kitchen to show off your chic dish collection.
Don’t forget to measure your space accurately; we don’t want a shelf that’s too big or too small.
you can incorporate different textures to create a more dynamic look that complements your kitchen decor.
And hey, consider adding some color or texture for that extra wow factor.
With its strength and durability, concrete can support a variety of items without sagging, making it a reliable choice for your shelving needs.
Let’s make it uniquely yours!
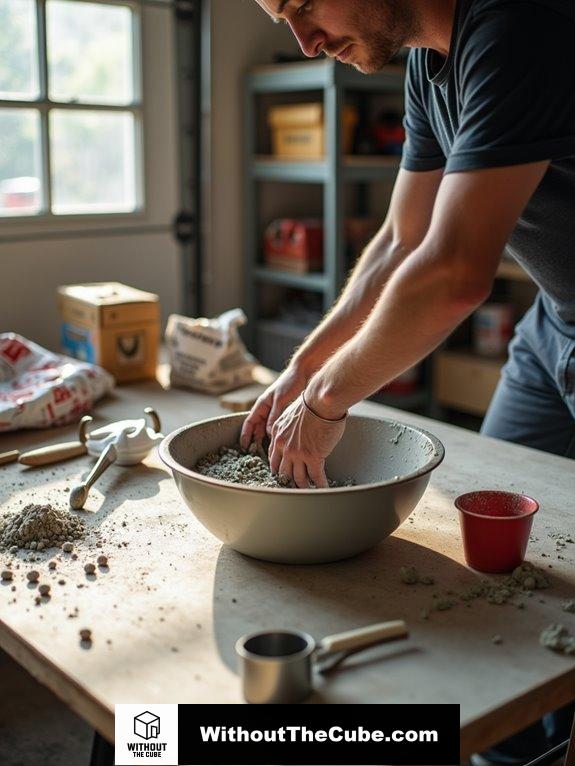
Prepare the Mold

To guarantee your concrete shelves turn out perfectly, preparing the mold is an essential step that shouldn’t be overlooked. Trust me, skipping this could lead to a concrete catastrophe!
First up, let’s talk about what you’ll need:
- Melamine board for a smooth finish
- Silicone molds for easy release
- Nail gun to secure everything tight
Start by cutting your mold base to the desired size. Make sure it’s clean and level—no one wants a wobbly shelf, right? Incorporating metal mesh sheets into your mold can provide added strength to your concrete shelves. using stylish minimalist designs can enhance the overall aesthetic of your shelving.
Seal any gaps with silicone, and don’t forget to apply mold release like cooking oil to prevent sticky situations.
With everything prepped, you’re one step closer to showcasing your elegant new shelves, crafted without the cube!
Embed the Brackets
Embedding the brackets securely is crucial for the stability of your concrete shelves. Trust me, you don’t want those shelves sagging like a sad puppy!
First, grab your hammer drill—it’s a must for drilling into concrete walls. Plan carefully where the brackets will go, avoiding those pesky masonry joints. Mark your holes with a level, then pre-drill using a masonry bit. Remember to determine the weight of the items you plan to place on the shelves before installation to ensure they can handle the load. make sure to use a concrete mix that is appropriate for your project to achieve optimal durability.
Next, insert your screws into those brackets and fasten them snugly. If you’re using masonry lag bolts, a socket wrench will be your best friend. Just keep in mind, don’t over-tighten; we’re securing, not wrestling!
Once they’re all set, double-check the level. You want these beauties to look good and hold strong. Happy shelving!
Pour the Concrete

With the brackets securely in place, it’s time to pour the concrete. Get excited; this is where the magic happens!
First, make certain your mold is clean and dry. Trust me, a clean mold means a happy pour! using concrete for your projects adds a touch of industrial chic to your space.
Next, pour the concrete gradually, filling in stages. You want even distribution, so take your time.
Don’t forget to vibrate the mold! This will help eliminate those pesky air bubbles that love to ruin our concrete dreams. remember that concrete is a durable and long-lasting material, making it an excellent choice for your shelves.
And hey, when you’re done, check that surface—no one wants a lumpy finish!
Here’s a quick recap to keep in mind:
- Fill the mold gradually for even distribution.
- Vibrate to eliminate air bubbles.
- Confirm a level surface for a sleek look.
Let’s do this!
Demolding Process

Demolding your concrete shelving is an exciting moment, revealing the fruits of your labor. Trust me, it’s like unwrapping a gift you made yourself!
First, make sure your mold is stable and the concrete is fully set. A little release agent like vegetable oil goes a long way—who knew? remember to follow the cement to water ratio as per the manufacturer’s specifications for the best results.
Start by loosening the edges gently. Then, grab your craft knife and cut away the mold material. Tap it lightly to release any sneaky air pockets hiding in there.
Peel off that mold slowly; it’s like taking off a tight sweater—no one wants to rip it!
Finally, inspect for defects and sand any rough edges. Soon, you’ll have stunning shelves ready to dazzle your space!
And keep in mind, we created this blog Without The Cube, promoting superior interior design.
Assembly and Installation

Now that you’ve successfully removed your concrete shelves from their molds, it’s time to bring your vision to life through assembly and installation.
First, gather your materials, including steel pipes, fittings, and tools. Planning the pipe layout is essential, so visualize how your shelves will sit.
- Level it right! Make sure everything is straight for that Instagram-worthy look. Remember, leveling is crucial to prevent accidents with heavy blocks.
- Secure it safely! Use drywall anchors to keep your masterpiece in place.
- Check for stability! A little wobble? Not on my watch!
Carefully attach your concrete shelves to the pipe framework, and don’t forget to double-check everything before you step back to admire your handiwork.
Trust me, it’s worth it! Happy building!
Avoid Uneven Concrete Mixing
Ensuring consistency in your concrete mixing is essential for achieving smooth, even shelves. Trust me, you don’t want your beautiful shelf to end up looking like a lumpy potato!
First, make sure all your materials are mixed uniformly. Using a level cement can make a world of difference. consider using scaffold boards for their strength and durability to support your shelving.
And don’t forget to level your mold before pouring—nobody wants a shelf that’s more of a roller coaster ride!
I also recommend using a release agent, like silicone spray, to make demolding a breeze.
Tapping or vibrating the mold can help release pesky air bubbles, too, but it’s not always necessary with leveling cement.
Add Plants for Warmth
Incorporating plants into your concrete shelving can truly transform the atmosphere of your space.
Seriously, nothing says “I’ve got my life together” like a shelf full of vibrant greenery, right?
Here’s how to level up your concrete design:
- Maximize Space: Use tiered shelves to fit more plants and create visual interest.
- Customize Styles: Mix in colorful pots or natural tones for a chic touch.
- Be Versatile: Showcase herbs or even cute succulents that bring life to any corner.
Let’s be real, plants not only look great, but they also purify the air! Adding DIY concrete projects to your home can further enhance its aesthetic and charm.
So, why not give your concrete shelving a warm, inviting vibe?
Your home will thank you, and you’ll feel like the interior design genius you are!
Summary
I just finished making my own minimalist concrete shelves. The cool concrete contrasts beautifully with my plants, creating an inviting space. This project not only adds functionality but also reflects my personal style in my home.
I’d love to hear about your experiences with DIY projects. What have you created that brings your space to life?
If you found this helpful, consider sharing it on social media to help others discover Without the Cube.
Leave a Reply