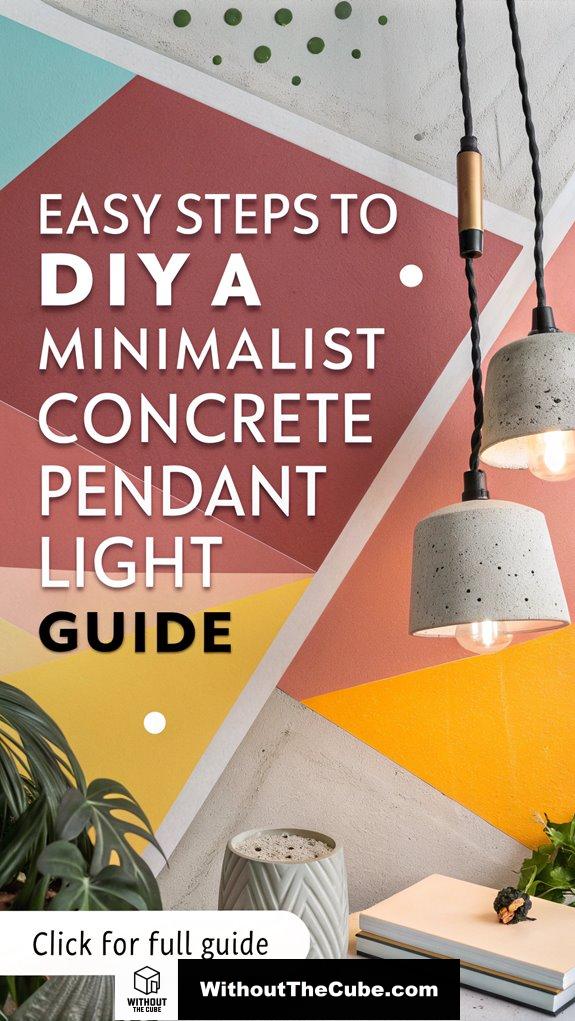
Ever thought a concrete pendant light could be your new best friend?
Well, I did, and let me tell you, the journey was a wild ride!
I grabbed some plastic containers for molds and mixed quick-setting concrete like I was whipping up a gourmet pancake batter. Spoiler alert: it’s not as easy as it looks!
After pouring the concrete and waiting patiently (read: impatiently) for it to cure, I drilled holes like a DIY warrior and finally assembled my masterpiece.
Talk about a glow-up for my space!
If you’re itching for more interior design hacks, you’re in the right place! I created my blog, Without The Cube, to help everyone elevate their interiors.
—
A Client’s Concrete Vision
Not too long ago, a client wanted a unique light fixture for their eclectic living room. They were stuck on the idea of using concrete but worried about its cold vibe.
I assured them that with the right design, it could be warm and inviting. We went for a minimalist concrete pendant light that complemented their vibrant decor.
By mixing textures and colors, we created a stunning focal point. The end result? A space that felt both chic and cozy.
So, if you’re hesitant about going concrete, trust me, it can totally transform your space!
Key Takeaways
- Gather all necessary materials, including quick-setting concrete mix, pendant light kit, molds, and protective gear to ensure a smooth process.
- Prepare the molds by cleaning and securing them, ensuring they can withstand the concrete pouring without leaking.
- Mix the concrete according to package instructions until achieving a smooth, pancake batter-like consistency, avoiding air bubbles.
- Pour the mixture into the molds, inserting the light socket halfway to create a cavity, and tap gently to release any trapped air.
- Once cured, drill holes for fixtures, assemble components securely, and hang the pendant light while ensuring it meets electrical safety codes.
Prepare Your Mold

When I set out to create my minimalist concrete pendant light, preparing the mold became my first essential step.
I grabbed some plastic bottles for mold materials, cutting off the tops to shape them. Using suitable mold materials can significantly affect the final outcome and ease of removal.
Cleaning and securing the mold guaranteed stability during the pour. Ever thought about mold stabilization? It’s key to avoid those pesky leaks and keep your design flawless. choosing durable materials for your molds is crucial to ensure they withstand the concrete curing process.
Trust me, it’s worth the effort!
Drill Necessary Holes

How do you guarantee your concrete pendant light looks polished and professional?
Start by picking the right drill types, like a rotary hammer drill, and using safety gear like gloves and protective eyewear. using the right mixing ratio for your concrete can ensure a strong and durable final product.
Mark your spots clearly, apply gentle pressure, and keep a steady hand.
Drill in small increments, and bear in mind: a clean workspace leads to a cleaner design! ensuring that all fixtures are made from outdoor-rated materials will help enhance the durability of your project.
Let’s get to work!
Mix the Concrete

After drilling the necessary holes, it’s time to mix the concrete.
I love using Quikrete 5000 for its strength! Just follow the package’s water ratio and get ready to release your mixing techniques. Mixing concrete is essential for creating a DIY concrete pendant lamp that is both durable and stylish. The choice of minimalist design elements can further enhance the aesthetic appeal of your project.
Stir it with a mixing spoon until you hit that smooth consistency—think pancake batter!
Avoid runniness, or you’ll have a concrete flood.
Ready to mold your masterpiece? Let’s go!
Coat Molds for Release

Coating the molds for release is an essential step in ensuring your concrete pendant light turns out perfectly.
I love using cooking spray as a release agent—it’s simple and effective! Just apply a thin layer to clean molds for smooth concrete removal. This will help prevent any issues during the demolding process. Trust me, proper mold maintenance makes all the difference. using a release agent can significantly reduce the likelihood of concrete surface imperfections that can occur when the concrete adheres to the mold.
Ready to make your light shine? Let’s keep it fun and innovative, just like we do here at Without The Cube!
Pour Concrete Mixture

Pouring the concrete mixture is an exciting step in creating your pendant light. I love using Quikrete 5000 for its versatility! As I mix, I watch the concrete texture come alive, with color variations adding character. Pour carefully into the molds, using a spoon to avoid spills. Keep in mind to tap the sides to release those pesky air bubbles—trust me, it’s worth it for that smooth finish! ensure to mix thoroughly to achieve a smooth blend and avoid lumps in your concrete. A well-prepared concrete mixture can enhance the overall aesthetic, allowing for creative designs in your pendant light.
Insert Structural Elements

Once the concrete mixture is poured and has settled, it’s time to focus on inserting the structural elements that will give your pendant light its functionality and stability.
First, place a threaded tube upright in the mix, securing it with nuts. This will help in achieving a sleek design that complements the minimalist aesthetic of your space.
Then, insert a 3 ½” deck screw for hanging. This step is crucial as it ensures that your light fixture will have the necessary functional and aesthetic appeal for any modern interior.
Trust me, these steps will make your light both stylish and sturdy!
Let’s keep creating without the cube!
Allow Concrete to Cure

Let’s focus on allowing the concrete to cure properly, as this step is essential for ensuring the durability and strength of your pendant light.
You’ll want to maintain a curing temperature between 50°F and 90°F for ideal hydration.
Use wet burlap or insulated blankets to keep moisture in.
Keep in mind, patience is key—better curing means a stronger, more beautiful light. proper curing can enhance the aesthetic appeal of your concrete fixture, giving it a refined, polished look.
Trust me, it’s worth the wait!
Assemble the Pendant Light

Assembling your pendant light is an exciting step that brings your vision to life.
Here’s what you’ll need to do:
- Prepare the threaded tube and secure it with nuts.
- Thread the pendant cord through the concrete and attach the socket.
- Connect the electrical components snugly.
With a dash of design inspiration and the right pendant materials, you’re one step closer to that stunning light! incorporating minimalist concrete shelving into your space can enhance the overall aesthetic of your home.
Avoid Uneven Concrete Mixing

How can you guarantee your concrete mix turns out perfectly every time?
Well, mastering those mixing techniques is key! Make sure you mix long enough to create a smooth blend, and don’t skimp on that water-cement ratio. Plus, pay attention to aggregate distribution—uneven chunks can ruin your project. Trust me, a little extra care here makes a world of difference in your stylish pendant light! consider using measuring tools to ensure precision in your mix proportions for optimal results.
Creative Lighting Arrangement Tips

Here are some fun tips to elevate your space:
- Highlight surfaces for cozy ambient lighting.
- Combine light sources for dynamic effects.
- Use mini pin lights as decorative accents.
- Consider using your concrete countertops as a backdrop for your aesthetic lighting design to create a cohesive look.
Let’s make your space shine with style!
FAQ
What Type of Light Bulb Should I Use for My Pendant?
When choosing a bulb for my pendant, I consider wattage and color. I prefer LED bulbs around 60W for efficiency and a warm white color to create an inviting atmosphere. It’s a perfect blend of innovation and comfort.
How Do I Safely Clean up Concrete Spills?
I know it feels intimidating to tackle concrete spills, but proper concrete cleaning techniques can ease your worries. For spill prevention, always use protective gear and act quickly to keep your space looking fresh and innovative.
Can I Paint or Stain the Cured Concrete?
Absolutely, I can paint or stain cured concrete! I love exploring vibrant color options and applying unique finishing techniques. It transforms the look, adding personality and depth to my projects, making them truly stand out.
What Is the Best Way to Hang the Pendant Light?
Did you know that pendant lights can enhance a room’s ambiance by up to 20%? When hanging yours, aim for a height of 24″-28″, ensuring the wire length fits perfectly for a sleek look.
Are There Any Specific Electrical Safety Tips to Follow?
When tackling electrical work, I always prioritize wiring precautions and grounding techniques. Recall to turn off power, inspect connections, and use GFCI outlets. Safety’s essential, letting creativity flow while keeping everything secure and functional.
Summary
I’ve just transformed a dull space into a stylish one with my own concrete pendant light. It turns out, concrete can be both simple and sophisticated. Now, I’m excited to showcase my creation as a focal point in my home.
I’d love to hear about your DIY experiences. Have you tried making your own pendant light or similar projects?
If you found this guide helpful, please consider sharing it on social media. It helps us reach more DIY enthusiasts at Without the Cube!
Leave a Reply