Ready to dive into the world of concrete baskets? Buckle up, because I’m sharing my minimalist journey with a twist of humor!
First things first, I learned the hard way—grease those molds! Trust me, a sticky mess is not what I signed up for.
Next, mix your concrete until it’s just right. Think of it as the thickest pancake batter you’ve ever made. Who knew concrete could be so fussy?
Fill the molds, but don’t be a hero—take your time. I once rushed it and ended up with a lopsided disaster.
Let it dry a day or so. I know, waiting is the hardest part!
When it’s firm, carefully unmold it. It’s like unpeeling a banana, only less tasty.
Cure for a few days, and for goodness’ sake, remember those drainage holes. Trust me, soggy plants are not cute!
Finally, pop in some fabulous plants for that cozy vibe.
Excited? Just wait—there’s so much more to explore!
—
From Concrete to Cozy: A Real-Life Design Tale
Once, I worked with a client who wanted a unique centerpiece for her living room. We decided on a concrete planter, but I could feel her hesitation.
“Concrete? Really?” she asked, eyebrows raised.
With a little coaxing and a few design tricks, we created a stunning piece that tied her whole room together. The right plants turned it from cold to cozy, proving that concrete can be warm too!
This experience reinforced my belief that interior design is all about balance and finding beauty in the unexpected. Who knew I’d be promoting superior interior design with my blog, Without The Cube?
Key Takeaways
- Clean and grease the mold thoroughly with a release agent to prevent sticking and ensure a smooth finish.
- Mix concrete to a uniform consistency, gradually adding water while avoiding a soupy texture.
- Pour the concrete slowly into the mold, using a trowel for corners and gentle vibrations to eliminate air bubbles.
- Allow the concrete to cure for at least 24 hours, ensuring it remains moist and covered to prevent cracking.
- After curing, carefully unmold the basket and incorporate plants or decorative elements for a minimalist design.
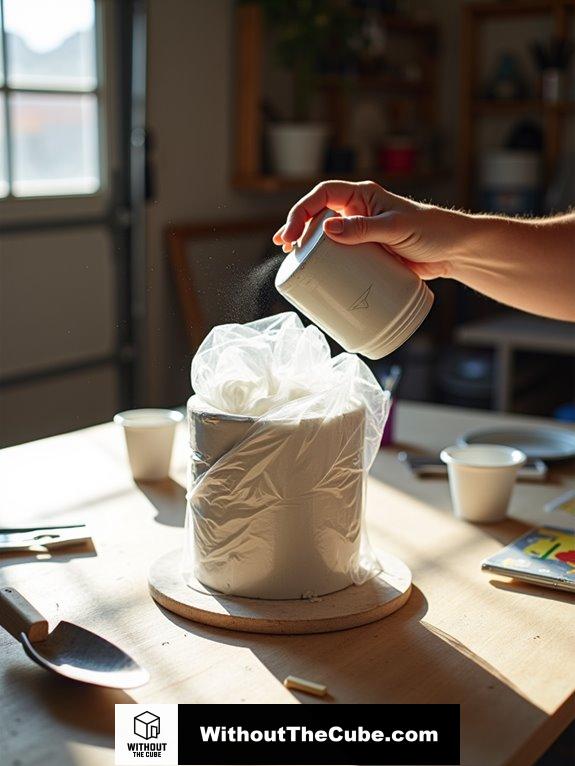
Grease the Molds
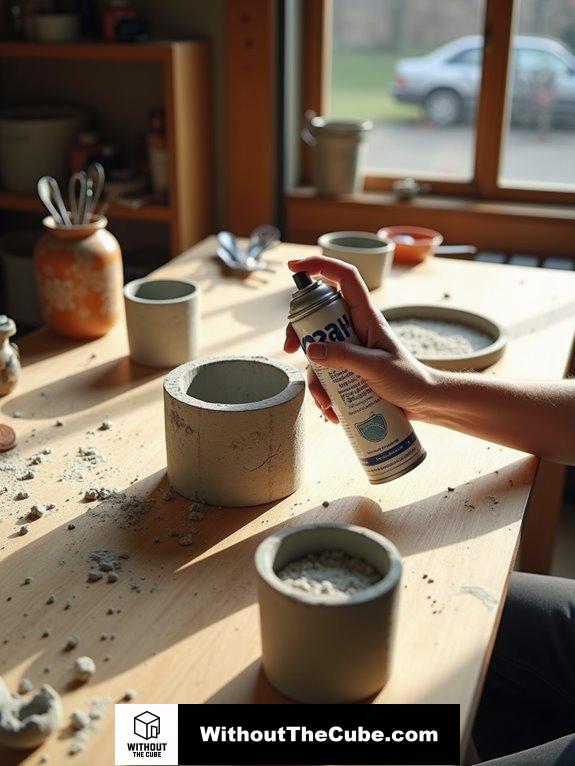
To get started with your minimalist concrete basket, greasing the molds is essential for a successful project. Trust me, a little prep goes a long way!
First, make sure your mold is squeaky clean—dust and debris aren’t your friends here. This step is crucial because any imperfections can affect the final look of your basket.
Next, grab a release agent like good ol’ canola oil spray or even beeswax if you’re feeling fancy. Just shake it up and spray an even coat, keeping about six inches away. Recall, less is more; we don’t want a swimming pool of oil in those deep spots! Using a release agent properly can extend the lifespan of your concrete molds, making them last for many projects to come.
Now, wipe away any excess oil—nobody wants residue ruining their concrete masterpiece. Seriously, it’s like wearing socks with sandals! Remember, proper greasing techniques are key to achieving a smooth surface and avoiding sticking issues during the demolding process.
Get ready, because soon you’ll be crafting something fabulous.
Mix the Concrete

Mixing the concrete is where the magic begins, and getting the right consistency is essential for your minimalist basket. Trust me, it’s like making the perfect smoothie—too much water, and you’ve got a watery mess! I usually hand mix for small projects. First, I grab a clean, non-porous platform and blend sand and cement until they look like a sandy beach. Then, I toss in coarse aggregates and gradually add water. Recall, you want a uniform mix, not soup! If you prefer a machine, just wet the drum first, then add your dry ingredients and mix for a couple of minutes before introducing water. Remember, quality concrete ensures structural integrity and longevity for your projects. A well-mixed concrete will also contribute to the overall aesthetic appeal of your final product. Got it? Now, let’s create something fabulous together!
Fill the Molds
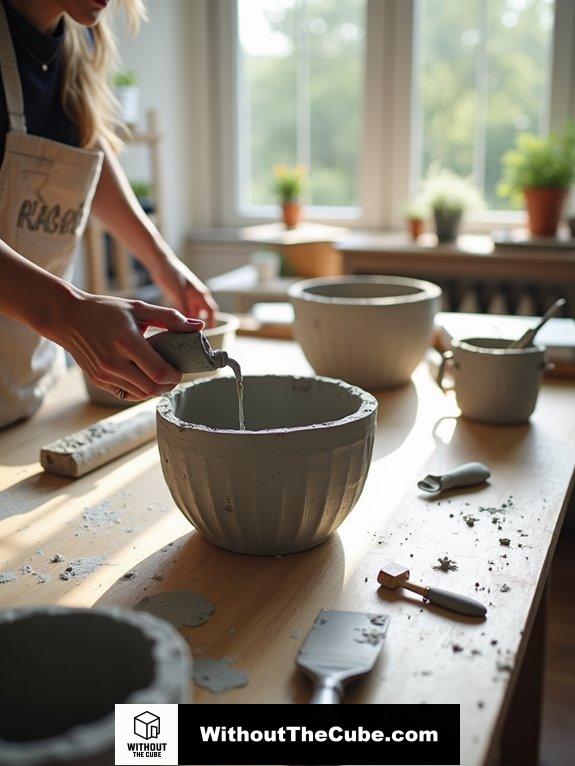
Filling the molds is an essential step in creating your minimalist concrete basket. I like to take my time here, pouring the concrete slowly to avoid those pesky air pockets. Grab a trowel to work the mix into the corners, and give the mold a gentle vibration—trust me, those bubbles will disappear like magic! Don’t forget to overfill slightly; it’s better to have a little excess than a sad, flat basket. Use a leveling tool to smooth the top, and voila!
Remember, this isn’t just about the concrete; it’s a creative adventure. using uniformly sized strips of paper can enhance the overall structure and aesthetic of your final product. The right mixing technique can significantly improve the strength and durability of your concrete. So, are you ready to release your inner designer? At Without The Cube, we’re all about elevating your space with innovative ideas!
Dry the Concrete

After pouring the concrete into the molds, the next essential step is drying it properly. You don’t want to rush this part!
Let’s talk about drying time. If you want to walk on it, give it a solid 24 to 48 hours. But driving? Well, that takes up to a week—patience is key! During this period, it’s important to monitor the conditions to ensure the best outcome.
To keep your concrete happy, consider sprinkling it with water or covering it with burlap. This helps retain moisture and prevents those pesky cracks. Maintaining optimal humidity levels is crucial to ensure your concrete dries effectively.
And hey, if it’s sweltering outside, shade it to avoid evaporation. Be aware that extreme temperatures can affect drying time significantly.
Remember, hydration is everything! Checking the temperature and humidity will save you from a concrete catastrophe.
Stay on top of it, and your minimalist basket will be as strong as your DIY spirit!
Unmold the Planters
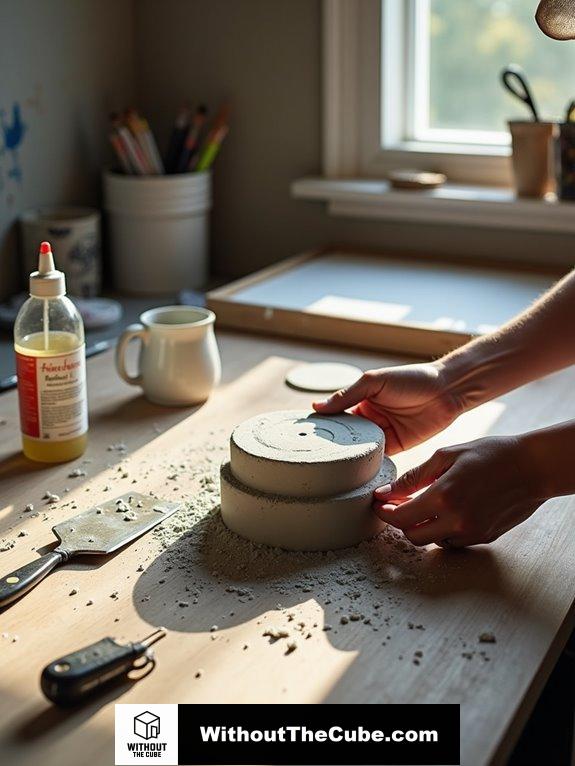
Unmolding your concrete planters is an exciting moment in the DIY process, but it requires a careful touch.
First, make sure you’ve greased your mold like you’re prepping a pan for a cake. Then, give it a gentle shake to loosen the concrete. If it’s being stubborn, don’t panic! A little tap around the edges can do wonders but using a smooth and even surface can help ensure that your concrete dish rack comes out perfectly.
Here are some handy tips:
- Use cooking oil or canola spray for lubrication.
- Wait for the concrete to set properly—patience is key! Drainage holes are essential for plant health, so consider adding them during the process.
- Avoid using excessive force; no one wants a cracked planter.
- If needed, grab a utility knife to cut the mold.
- Embrace the excitement; your masterpiece is about to be revealed!
Happy crafting, my friend!
Cure the Planters
Once your planters are free from their molds, it’s time to focus on curing them properly. This step is essential, trust me; you don’t want a cracked mess on your hands!
Most concrete mixes need about a day to cure, but don’t rush it. Tiny crafts might be ready faster, while those grand planters could take up to five days. Proper handling and curing are essential for the longevity of your planters.
If the weather’s hot and dry, your planter could cure too quickly, causing cracks—yikes!
I usually mist mine and wrap them in a plastic bag to keep them cozy.
Create Drainage Holes
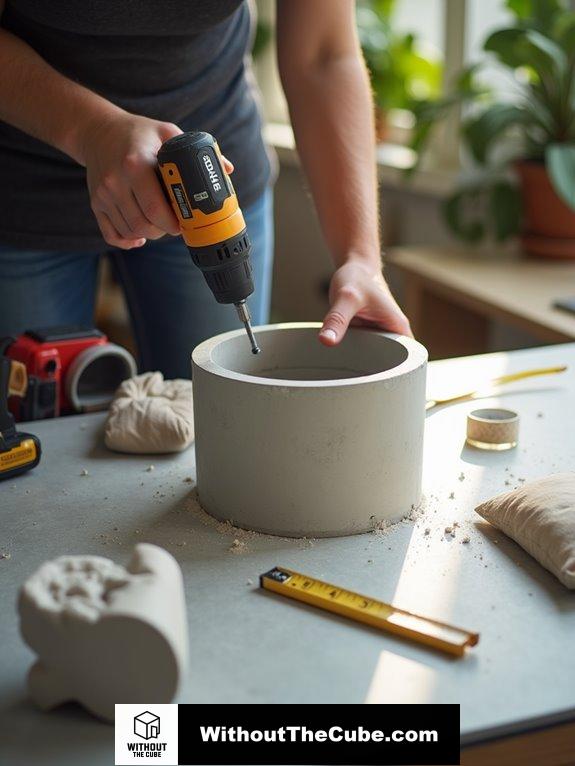
Creating drainage holes is essential for ensuring your concrete basket supports healthy plant growth. Trust me, I learned the hard way!
Here’s how to get it right:
- Drill holes in the bottom or sides of your basket.
- Make sure they’re big enough for excess water to escape.
- Space those holes evenly to avoid creating puddles.
- Consider laying down a piece of newspaper or a coffee filter over the holes to keep soil in place.
- And don’t forget to drill before you add the soil to avoid root damage!
- rocks do not improve drainage; they can actually create more issues for your plants.
With these simple steps, you’ll prevent root rot and keep your plants thriving.
Who doesn’t want a happy plant? Let’s keep it fresh and fabulous, shall we?
Avoid Uneven Concrete Mixing

When it comes to crafting a minimalist concrete basket, ensuring a uniform mix is essential for achieving a sturdy and aesthetically pleasing result.
Trust me, if you skimp on mixing time, you might end up with a concrete surprise—like rocks hiding in plain sight!
Don’t forget about maintenance; a mixer with worn-out blades is like a chef with a dull knife—no fun!
And if Mother Nature decides to throw a tantrum with extreme temperatures or humidity, adjust your mix accordingly.
Incorporate Plants for Warmth

After getting the concrete mix just right, I love to enhance my minimalist concrete basket by incorporating plants that bring warmth and character.
Who doesn’t want a little greenery to jazz things up, right?
Here’s how I do it:
- Choose plants with varying textures, like succulents or ferns.
- Arrange them starting with larger plants and filling in with smaller ones for balance.
- Add decorative rocks or moss around the plants for that cozy touch.
- Place the basket where it can soak up some sunlight—because plants love a good tan!
- consider using a faux concrete technique to create a unique look for your basket.
- Don’t forget to switch up the plants seasonally to keep it fresh and fun!
Trust me, your basket will look like it belongs in a design magazine!
Summary
Creating a minimalist concrete basket is a rewarding experience. I enjoy crafting something unique that can enhance my space. Once completed, it becomes a stylish home for my favorite plants, sparking conversation among friends.
Have you made your own concrete basket? Share your experience in the comments below!
If you found this post helpful, please share it on social media to help others discover our blog, Without the Cube.
Leave a Reply