
Creating my own DIY artistic concrete sculpture was an adventure.
I mean, who knew playing with concrete could be this fun?
First, I sketched out my wild design—because why not? Then I built a solid support frame. Trust me, metal is key; I learned that the hard way!
Next, I filled it with expanding foam for some texture. Pouring Quickrete was like trying not to spill a drink in a crowded bar—an art in itself!
Finally, I got to unleash my inner Jackson Pollock with colors and textures. Nailed it!
Check out my blog, Without The Cube, where I share tips for superior interior design.
Real-Life Client Project: Sculpting Spaces
I once worked with a client who wanted a unique centerpiece for their modern living room. They were stuck on the idea of a concrete sculpture, so I guided them through the process. We ended up creating a stunning piece that not only enhanced their space but also became a conversation starter. It’s amazing what a little creativity and concrete can do for interior design!
Key Takeaways
- Begin by sketching your design to visualize the sculpture and address potential challenges and measurements.
- Create a strong support frame using metal and fill it with expanding foam for shaping.
- Mix and apply concrete layers carefully, minimizing air bubbles by vibrating the mold and ensuring proper curing.
- Finish edges and surfaces with smoothing tools, sanding for a polished look, and adding details for artistic impact.
- Enhance color and texture with base coats, stains, and layering techniques, ensuring durability with high-quality outdoor paints.
Sketch Your Design

When beginning your artistic concrete sculpture journey, it’s essential to start with a solid sketch of your design. Think of it as your sculpture’s blueprint, guiding you through the creative chaos!
I often start by doodling various ideas, letting my creativity run wild. What size will your masterpiece be? Envision it sitting proudly in your garden, or towering over your living room! Incorporating elements of unique concrete wall art can inspire new dimensions and textures in your design.
Sketching from different angles helps me see it in 3D, which is vital for stability—nobody wants a wobbly creation, right? having a clear conceptual sketch can greatly aid in planning the materials you’ll need for your sculpture.
And don’t forget the details! Include measurements and potential challenges; trust me, future-you will thank you.
It’s all about refining those sketches until you’re bursting with excitement for what’s next. Are you ready to bring your vision to life?
Create Support Frame

With your design sketch in hand, it’s time to bring it to life by creating a sturdy support frame.
First, grab some strong metal, like steel or aluminum, because we want our frame to stand the test of time. Use a chop saw to cut those pieces just right—precision is key! Mould preparation is crucial for ensuring the frame has the right dimensions. To enhance durability, consider using high-quality concrete for your final sculpture, as it can significantly improve the longevity of your piece.
Got curves in your design? Heat the metal and bend it around a wooden form; it’s like giving your frame a little hug.
Don’t forget to add some scrap metal at the bottom for stability, especially if you’re adding heavy elements later.
Fill With Expanding Foam

Now that you’ve got your sturdy support frame ready, it’s time to fill it with expanding foam to form the core of your sculpture.
You can grab some urethane foam at your local hardware store—trust me, it’s a game changer! Just spray it directly onto your wire armature. Don’t worry, it’ll expand like your ambitions, so keep a trash bag handy to catch any rogue foam. And hey, if you want to get fancy, use straws for reinforcement. Seriously, the texture you can create is incredible! Foam sculpting is accessible for beginners, encouraging attempts at creating foam sculptures. using custom concrete can elevate your sculptures with unique designs and finishes.
Once it’s set, you can shape and detail it to perfection. Can you envision the possibilities? With a little patience and some gloves, you’ll have a unique core ready for your artistic journey. Let’s get sculpting!
Apply First Concrete Layers
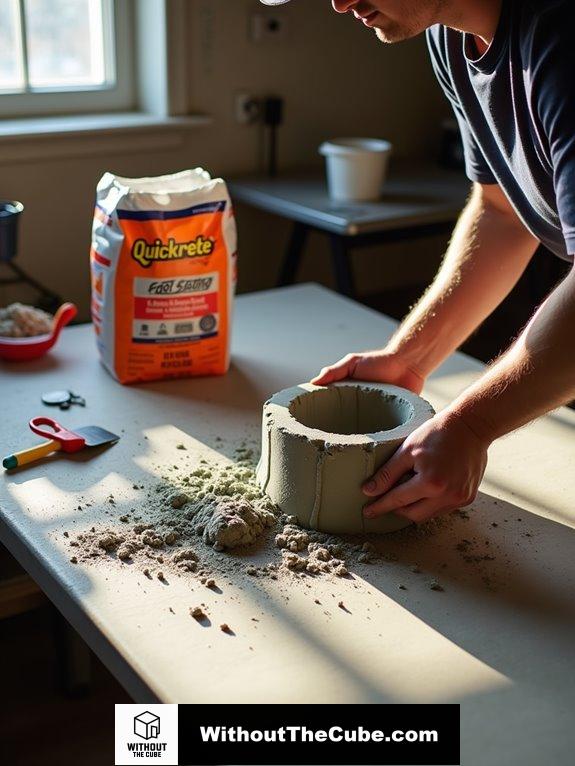
After letting the expanding foam cure, the next step is to apply the first concrete layers, which will give your sculpture its initial structure and durability. I like to start by mixing Quickrete Fast-Setting Concrete with just the right amount of water. Think Goldilocks—too much, and it’s soup; too little, and it’s a dry mess.
Pour the concrete from the lowest point of your mold, shaking it gently to kick out pesky air bubbles. For those tight corners? Give it a little vibrate, and watch the magic happen!
Using a concrete sealer after the initial cure can also help enhance durability and finish. Oh, and don’t forget to keep the mold moist during curing. We want a masterpiece, not a cracked disaster. Ready to rock this? Let’s get our hands dirty!
Layer and Smooth

Sculpture’s beauty often lies in its layers and smooth surfaces, so let’s plunge into the next steps.
First, I like to grab some expandy foam—yep, that “Great Stuff” kind—and cover my support frame. It keeps things lightweight and budget-friendly! Incorporating artistic concrete sculpture techniques can elevate the overall design and appeal.
Then, I assemble EPS pieces with hot glue; it’s my best friend for sticking things together.
Using clay, I can sculpt initial forms before moving on to silicone and gypsum for detailed molds.
Now, when pouring that quick-drying concrete mix, I start at the mold’s lower point to avoid pesky air pockets. A gentle shake settles it nicely, it’s crucial to adhere to the water-to-powder ratio specified on the concrete bag to ensure a strong final product.
Cure the Sculpture
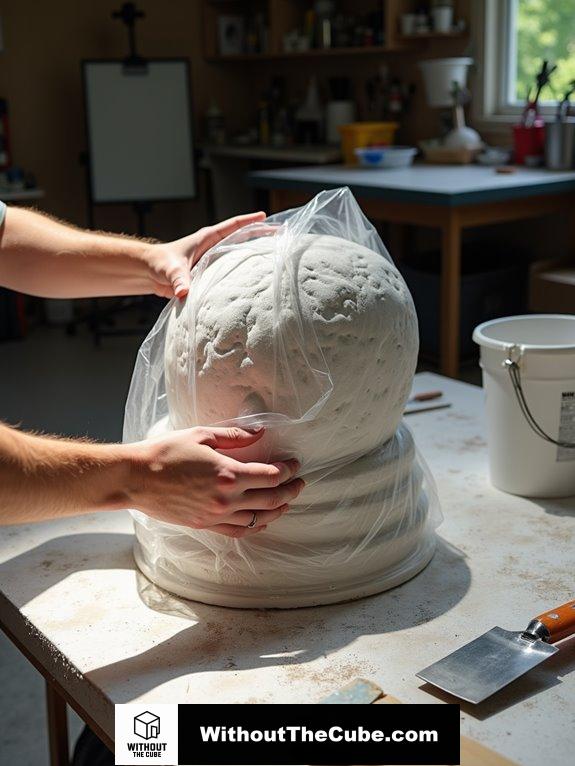
To achieve a stunning and durable artistic concrete sculpture, proper curing is essential. Seriously, don’t rush this part! The magic happens over 28 days, but you’ll see strength building in just a few days. Incorporating fibermesh® 150 polypropylene fibers into your mixture helps enhance the overall strength during the curing process.
If it’s hot outside, your sculpture might cure faster, which is great, but high humidity keeps things moist and prevents cracking. So, don’t skip wrapping your masterpiece in plastic to hold in that precious moisture.
And please, don’t unmold it too early—that’s like letting a cake cool for 10 minutes and then slicing into it. You want firmness before you celebrate your creation!
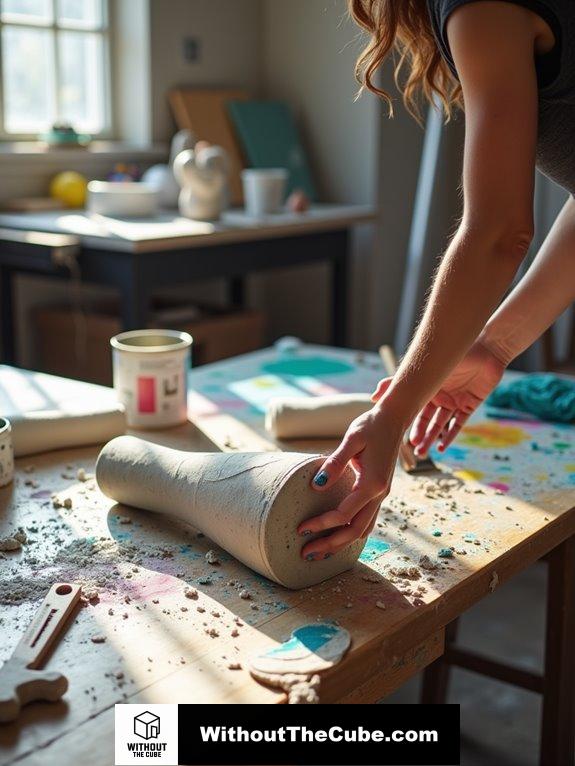
Finish Edges and Surfaces

Finishing edges and surfaces can truly elevate your artistic concrete sculpture, transforming it from a rough creation into a polished masterpiece.
First off, grab a magnesium float to smooth out that surface like butter. It’s like magic!
For those edges, a brass edger will become your new best friend—just angle it a bit and watch those curves come to life.
Oh, and don’t forget about sanding! Once your sculpture’s cured, a concrete disk will make those rough spots vanish.
If rustic’s your vibe, embrace those rough edges, but still, a little wet sanding can save you from a dusty mess.
Trust me, taking the time to finish your edges makes all the difference. It’s like the cherry on top of your artistic sundae!
Add Final Touches
Adding final touches to your artistic concrete sculpture can truly bring it to life.
Think of sealing as a superhero cape for your creation, protecting it from the elements while enhancing its durability. Grab a high-quality concrete sealer and follow those pesky manufacturer instructions to avoid any funky discoloration.
When it comes to painting, make sure your sculpture’s clean—no dust bunnies allowed! Outdoor-specific paints work wonders, and don’t forget that base coat; it’s like the primer for a fabulous makeover. A well-prepped surface leads to a more visually appealing finished product, so take your time with the cleaning process.
Want a little extra flair? Consider adding textures with concrete dyes or even embedding stones.
It’s all about those details! So, what’re you waiting for? Immerse yourself in those final touches and watch your masterpiece shine!
Incorporate Vibrant Color Accents
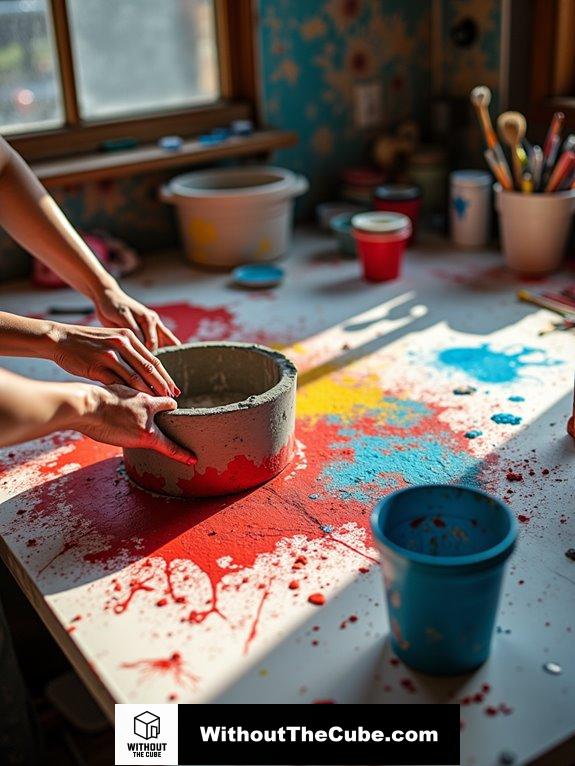
Incorporating vibrant color accents into your concrete sculpture can truly bring your artistic vision to life.
Have you ever seen a concrete piece that just pops? That’s the magic of color! You can go bold with acid stains for dazzling marbled effects, or mix in integral mineral pigments before pouring for rich, consistent hues. EverStain acid stains allows you to create stunning designs with natural tones like Avocado and Desert Amber.
Feeling creative? Try mixing acrylic paint into your concrete; it’s like adding sprinkles to a cupcake!
You can also paint your masterpiece after it sets, using high-quality outdoor paints to guarantee durability.
Don’t forget to seal it with an acrylic sealer for that glossy finish.
Summary
I created my own artistic concrete sculpture, transforming a simple idea into a unique piece. Each step, from mixing to pouring, was a chance to express my creativity, making it a rewarding experience that brightens my space.
I’d love to hear about your experiences with DIY projects. What have you created?
If you enjoyed this post, please share it on social media to help others discover Without The Cube!
Leave a Reply